9.2. Typical Configuration
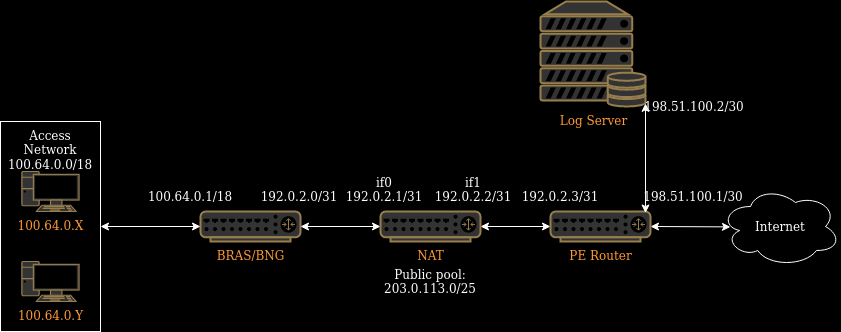
This section provides an example of a simple core network topology and explains how to configure the NAT to work in it.
Network Topology

The main elements of the example topology are:
BRAS – aggregates traffic from the Access Network.
NAT – translates private IP addresses into public IP addresses.
PE router – connects to the Internet.
Log Server – receives and stores session logs from the NAT.
The outbound traffic is processed in the following way:
The BRAS receives the subscribers’ traffic, enforces the billing policies, and sends the traffic to the NAT.
The NAT translates IP addresses into the public space and sends the traffic to the Provider Edge router.
The PE router then sends the traffic to the Internet according to the routing information received from the uplink router.
The inbound traffic is processed in the following way:
The PE router receives the traffic from the Internet and sends it to the NAT.
The NAT translates IP addresses back into the private space and sends the traffic to the BRAS.
The BRAS again enforces the billing policies and sends the traffic to the necessary subscriber.
NAT Configuration
First, let’s look at the whole NAT config needed to work in the topology described above:
!
interface if0
 ip address 192.0.2.1/31
 ip nat inside
!
interface if1
 ip address 192.0.2.2/31
 ip nat outside
!
ip route 0.0.0.0/0 192.0.2.3
ip route 100.64.0.0/18 192.0.2.0
ip route 198.51.100.0/30 192.0.2.3
!
nat log server 0 type ipfix ip 192.168.100.2 port 4739
nat log type session enable
nat log enable
!
nat pool default-pool
 range 203.0.113.1 203.0.113.127
 enable
!
nat subscriber-group default-group
 pool default-pool
!
nat rule subnet 100.64.0.0/18 subscriber-group default-group
!
As you can see, the configuration is pretty small and simple. Now let’s understand every part of it.
Interfaces
!
interface if0
 ip address 192.0.2.1/31
 ip nat inside
!
interface if1
 ip address 192.0.2.2/31
 ip nat outside
!
To ensure IP connectivity between the NAT and its neighbors, we have to set the necessary IP addresses on the interfaces.
Interface if0 connects to the BRAS and has IP address 192.0.2.1/31.
Interface if1 connects to the PE router and has IP address 192.0.2.2/31.
In addition to setting the IP addresses, we need to let the NAT know how to process the traffic received by the interfaces. We need to set the proper NAT type on them to do this.
Interface if0 faces the subscribers (inside network), so we set ip nat inside on it.
Interface if1 faces the Internet (outside network), so we set ip nat outside on it.
You can find more information about configuring interfaces in section Interfaces Configuration.
Routing
!
ip route 0.0.0.0/0 192.0.2.3
ip route 100.64.0.0/18 192.0.2.0
ip route 198.51.100.0/30 192.0.2.3
!
First, NAT must be able to forward the subscribers’ traffic to the Internet. To allow this, we need to add the default route 0.0.0.0/0 through the PE router 192.0.2.3.
Second, NAT must be able to forward the reverse traffic back to the subscribers. To allow this, we need to add the route to the access network 100.64.0.0/18 through the BRAS 192.0.2.0.
Third, NAT must be able to send logging messages to the log server. To allow this, we need to add the route to the log server network 198.51.100.0/30 through the PE router 192.0.2.3.
In addition to static routing, NAT also supports various dynamic routing protocols like BGP, OSPF, ISIS and RIP.
You can find more information about configuring routing in section Routing Configuration.
Logging
!
nat log server 0 type ipfix ip 198.51.100.2 port 4739
nat log type session enable
nat log enable
!
To comply with various government requirements, it is sometimes needed to log all subscriber connections passing through the NAT.
In the example above, we configure the NAT to send session logs to the server 198.51.100.2 on UDP port 4739 using the IPFIX protocol.
The nat log enable command enables the logging. Removing this command makes it possible to temporarily disable the logging without losing the whole logging configuration.
You can find more information about configuring logging in section Logging.
NAT
!
nat pool default-pool
 range 203.0.113.1 203.0.113.127
 enable
!
nat subscriber-group default-group
 pool default-pool
!
nat rule subnet 100.64.0.0/18 subscriber-group default-group
!
Finally, we need to configure the address translation.
First, we create and enable the public address pool named default-pool with IP addresses in the range from 203.0.113.1 to 203.0.113.127.
Second, we create a subscriber group named default-group and configure it to use the default-pool for translation.
Third, we create a rule to process all traffic coming from subnet 100.64.0.0/18 using the subscriber group default-group.
You can find more information about configuring pools, groups, and rules in sections Pools, Subscriber Groups and Rules.